
The header of a blister card does the heavy lifting before a customer ever touches the peg.
On a loaded retail hook, the lower portion of rear packages disappears behind the front product. The top exposed band—the header—must carry your brand identity, communicate what the product is, distinguish the exact SKU variant, and withstand mechanical hanging stresses without tearing.
Why the Header Is Different From the Rest of the Card
Most packaging dielines treat a blister backing card as a flat canvas. But at retail, the header operates under unique constraints that the lower card never encounters:
- Permanent Visual Exposure: Transparent blisters showcase products on the front card, but only the header remains continuously exposed across rear packages on the peg.
- Hardware Penetration: Metal peg hooks physically puncture the header zone, requiring strict clearance around punch openings.
- Dynamic Mechanical Load: The full weight of the product, blister, and board hangs from an opening under one inch wide, subjected to browsing friction and restocking tugs.
Design for What Remains Visible on a Loaded Peg
Never evaluate header artwork as an isolated flat file. In retail aisles, blister cards hang in tight rows. Front blister projection creates a shingling effect, hiding everything on rear packages except the upper 1.50 to 2.25 inches.
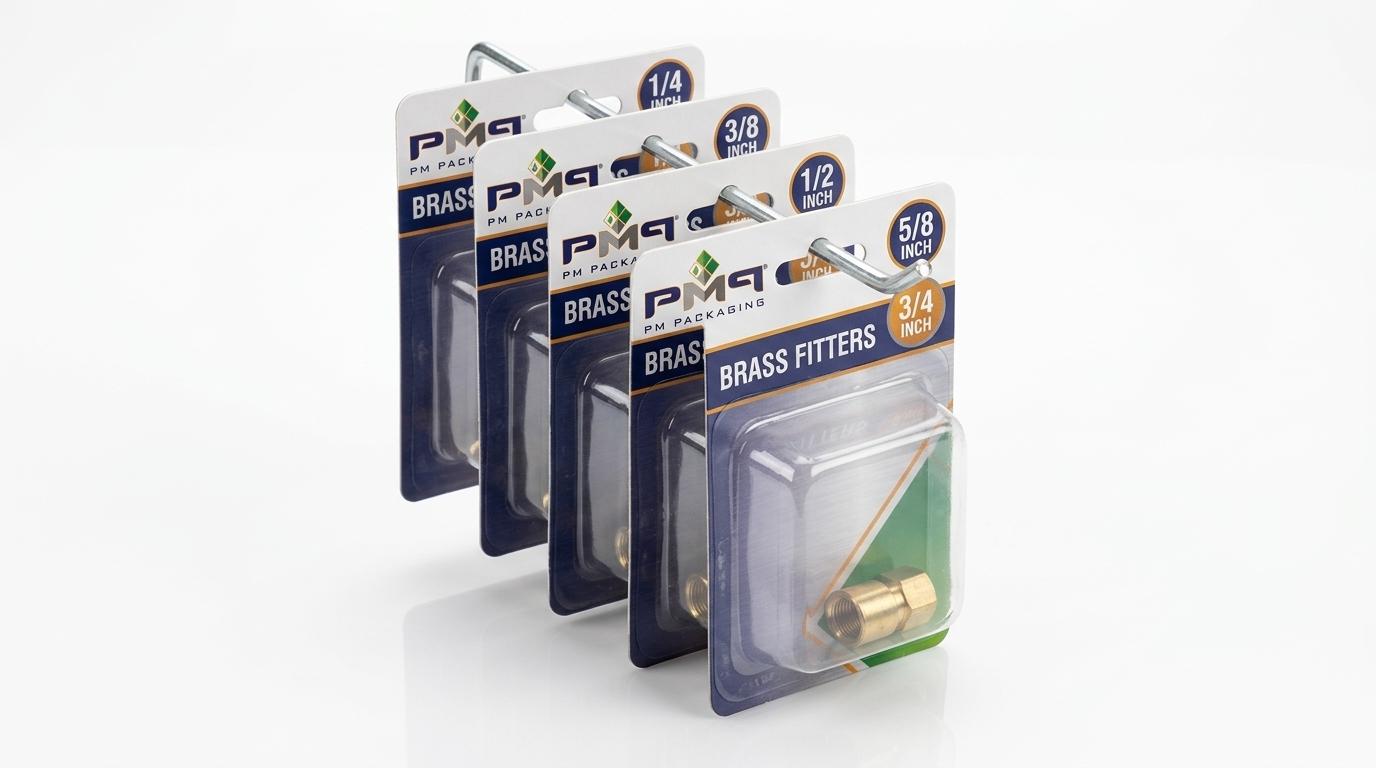
The Shingling Effect: Nesting packages on a retail peg hook leaves only upper header margins exposed. Critical variant data must live in this band.
Exposed depth depends on card height, cavity projection, product thickness, hook drop angle, and unit spacing. If SKU differentiators sit below this line, shoppers must unhook packages to browse, causing aisle friction and disorganized pegs.
What Information Belongs in the Blister-Card Header?
Header space is precious commercial real estate. Successful programs enforce a disciplined 4-level information hierarchy:
- Brand Identity: Prominent manufacturer logo positioned safely away from the hang-hole opening.
- Product Type: Concise functional descriptor (e.g., Air Hose Coupler, Masonry Bit, USB-C Cable).
- Critical SKU Variant: High-contrast differentiator (e.g., 1/4 INCH, 10 FT, Model B, 4-Pack).
- Primary Purchase Cue (Optional): Single high-impact claim only if decisive (e.g., Solid Brass, Titanium Coated).
Secondary specifications, warnings, and barcodes belong strictly on the card back. Review card copy allocation in our guide to blister-card packaging design.
Position Artwork Around the Hang Hole: Clearances & Tolerances
Avoid rigid rules like a universal 0.5-inch graphic safe radius. Real-world clearance depends on approved dielines, hook hardware diameter, and die-cutting registration tolerances (±1/32 inch).
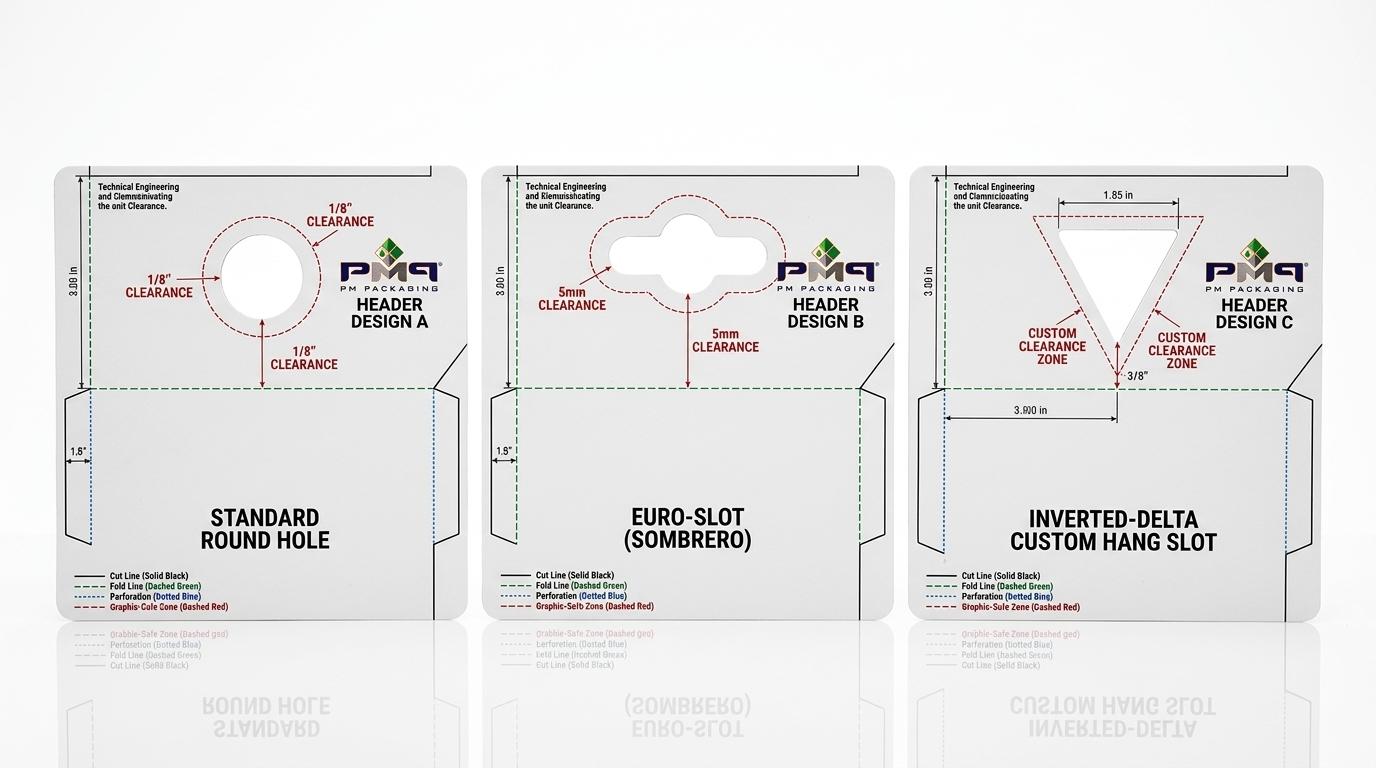
Graphic-Safe Zones: Defining clearance boundaries around punch openings protects brand typography from hardware contact and die-cutting shift.
Never center brand logos directly beneath the hang opening where wire hooks bisect typography. Position logos in corners or with vertical buffers.
Hang-Hole Styles: Round Hole vs. Euro Slot vs. Custom Feature
Punch style dictates available artwork area, retailer compatibility, and package stability:
- Standard Round Hole (5/16"–3/8"): Compact and cost-effective for lightweight impulse items, but prone to package rotation on single-wire pegs.
- Euro Slot (Sombrero / Butterfly): The national retail standard. Accommodates single or dual-wire prong fixtures and prevents lateral package sway.
- Inverted-Delta / Custom Slot: Centers weighted components automatically while preserving rigid perimeter margins.
Always confirm your retail partners' merchandising fixture guidelines before locking dielines.
Build SKU Differentiation Into the Visible Header
In multi-SKU retail lines—such as fasteners, drill bits, or fittings—maintaining an unbroken brand billboard across the aisle is critical, but individual part numbers must remain instantly scannable.
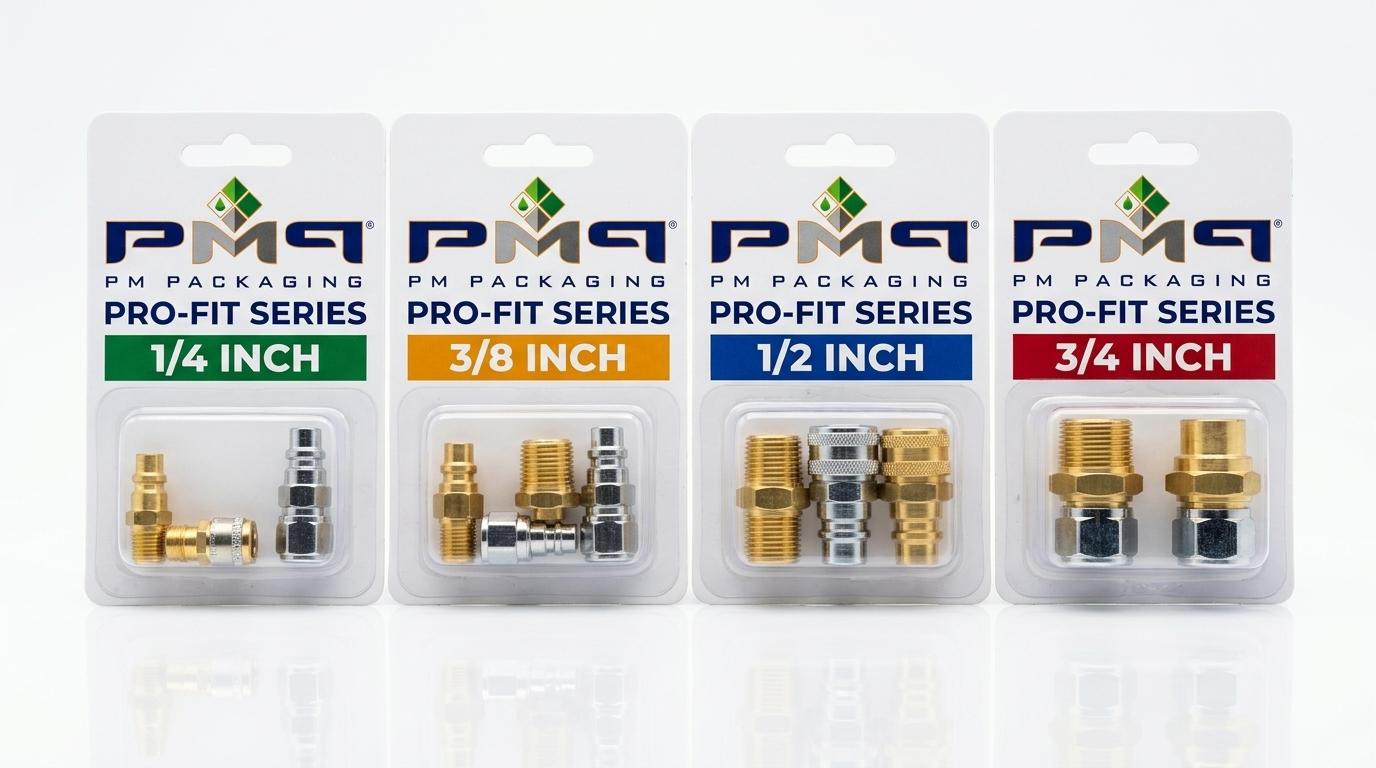
Visual Architecture: A uniform top brand header establishes shelf dominance, while high-contrast variant badges allow shoppers to quickly identify sizes.
Deploy a repeatable visual cue—whether bold numerals, distinct color blocks, or badge placement—in the exact same coordinate across every card. For catalog portfolio strategies, explore our guide to multi-SKU blister-card packaging.
Treat the Header as a Structural Load-Bearing Component
The header is a mechanical anchor bearing the static and dynamic load of the package. Retail failure modes include:
- Hole Elongation: Sustained product mass distorts the punch opening over time.
- Edge Tear-Out: Customer handling tears the board upward from the hole to the top edge.
- Forward Card Bowing: Heavy blister cavities pull the card face forward, causing peg droop.
Rather than assuming Solid Bleached Sulfate (SBS) with vertical grain is universally required, evaluate caliper (18pt–28pt), fiber stiffness, grain orientation, edge distance, and filled mass together. Review mechanics in our guide on how card size affects blister packaging performance.
Coordinate Hang Position With Product Center of Gravity
Hang-hole placement cannot be designed independently of blister geometry. If an asymmetrical tool or fitting is mounted off-center, the suspended package will tilt on single-wire pegs. Aligning the hang slot vertical centerline through the product's true center of gravity ensures level presentation across every peg facing.
The Multi-Card Loaded-Hook Prototype Audit
Evaluating a single flat proof on a conference table hides crucial real-world flaws. Mount 4 to 6 fully packed prototypes on a representative retail peg hook to audit:
- Visible Header Exposure: Confirm size and model text remain legible on units 3, 4, and 5.
- Hardware Collision: Verify wire hooks do not obscure logos or primary copy.
- Forward Deflection: Ensure cumulative weight does not cause excessive forward bowing.
- Removal Clearance: Check that packages slide off smoothly without snagging adjacent blisters.
6 Common Blister-Card Header Design Mistakes
- Centering Logos Over Hang Openings: Wire hooks visually slice through brand typography.
- Placing Variants Below the Shingle Line: Sizing copy hidden behind the front blister bubble.
- Overcrowding Promotional Claims: Secondary features dilute primary product recognition.
- Inadequate Top Edge Margin: Insufficient distance from hole to card edge causes tear-out.
- Designing Cards in Isolation: Missing multi-SKU visual alignment across adjacent peg facings.
- Oversizing Header Height: Inflates paperboard cost and master carton shipping cube.
The 12-Point Blister-Card Header Decision Checklist
Review these critical parameters before releasing blister-card header artwork and dielines to manufacturing:
| Header Parameter | Design Verification Check |
|---|---|
| 1. Brand Logo | Positioned clear of hang opening and hook contact |
| 2. Product Name | Legible at 3–5 foot browsing distance without unhooking |
| 3. SKU Variant | Size, model, or count placed in top exposed shingle band |
| 4. Hang-Hole Style | Matches retailer fixture standards (Euro slot vs. round hole) |
| 5. Graphic-Safe Buffer | Accounts for ±1/32" die-cutting registration shift |
| 6. Visible Header Depth | Core data kept within top 1.50"–2.00" exposed zone |
| 7. Board Caliper | Board grade and caliper resist tear-out under product weight |
| 8. Center of Gravity | Slot aligned with filled cavity mass to prevent tilting |
| 9. Header Proportion | Proportioned to fit copy without inflating shipping cube |
| 10. Finish & Contrast | Coating prevents aisle lighting glare on key text |
| 11. Catalog Cohesion | Hierarchy organized consistently across product lines |
| 12. Loaded-Hook Test | Physical audit completed with 4–6 units on actual fixture |
Frequently Asked Questions: Blister-Card Header Design
What core information belongs in a blister-card header?
The top band must prioritize brand identity, primary product type, and key SKU variant (size, model, or count).
How much clearance is required around the hang hole?
Clearance depends on dieline and hook hardware, maintaining at least 1/8" to 1/4" buffer.
Should the brand logo be centered directly beneath the hang slot?
No. The metal peg hook drops across the card face, bisecting centered graphics. Position logos in corners or with vertical buffers.
When should a Euro slot be used instead of a round hole?
Use Euro slots for national retail programs to support single or dual-wire prong hooks and prevent package rotation.
How do multi-SKU lines maintain scannability on pegboards?
Keep top brand graphics uniform while using consistent, high-contrast variant badges in identical coordinates on each card.
What causes blister cards to tear around the hang hole?
Insufficient edge margin, low caliper board for product mass, or aggressive restocking strain.
How does blister placement affect card hanging balance?
Off-center product cavities shift the center of gravity, causing the package to hang at an angle on single-wire pegs.
Should barcodes or certifications appear in the header?
No. Barcodes, legal warnings, and detailed specifications belong on the back of the card to preserve clean front visibility.
Why is loaded-hook prototype testing essential?
Testing multiple units reveals shingling overlap, hardware interference, and card bowing that single flat proofs never show.
Partner with PM Packaging for Complete Blister Card Engineering
Designing an effective blister-card header requires coordinating structural dielines, paperboard calipers, precision die-cutting, and retail planogram compliance. At PM Packaging, our integrated facilities deliver turnkey custom blister card manufacturing, custom thermoforming, water-based heat-seal coatings, and physical prototype testing under one roof.
Ready to Engineer Your Retail Blister-Card Headers?
Connect with our packaging structural specialists to audit your hang-hole geometry, optimize visible shingle areas, and produce physical production prototypes.